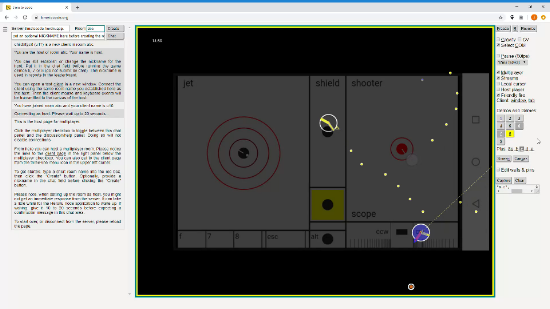
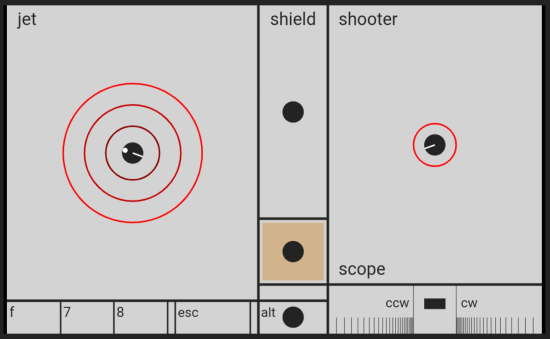
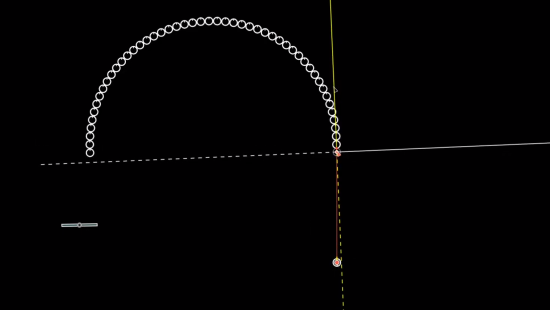
These videos are recordings from the Springs & Pucks page at triquence.org. Watch, then go there and play. In this first video, the shooter from the Puck Popper game is repurposed in a demonstration. You can find more on this in the last topic in the sundries section below. Try the live demo. Topics here: The S&P page is the offspring of the ideas and code on the Python page. If you've come from there you may want to stay awhile. The web browser has a rich development environment for JavaScript, all free. The HTML5 canvas offers beautiful rendering. The WebRTC communication protocol supports multiple users and enhanced play via virtual game pads. Box2dWeb animates here, no installations or plugins needed. These videos are best viewed full screen and at a quality setting of 1080p60.
As each plays, note its fullscreen
full-screen icon, bottom right. The esc key will pop you back to this page view.
|
|
| interactions | |
|
This group of videos demonstrates the keyboard and mouse operations used in interacting with the demos of the S&P page. |
|
Fling, move, and rotate This is a good place to start. The video shows how to throw (and catch), move, and rotate, a single puck, wall, or pin. The demos will never be quite the same after you've learned how to muscle things around. Mouse and keyboard details:
|
|
Forecast and shoot Shoot (launch) a puck as a projectile. Keyboard shortcuts are demonstrated for forecasting the motion and controlling the shot. Forecasts are based on the same symplectic Euler integration scheme that Box2D uses. The forecast is identical to the result that follows from the physics engine. The code for the forecast can be found in the drawProjectilePath function of the ghostBall.js module. Details:
|
|
Speed shots and the stepper Visualize high-speed shots into a target (a stack). After composing a shot, interrupt the engine loop with the stepper: Note that pucks modeled as bullets are shown in black. Details:
|
|
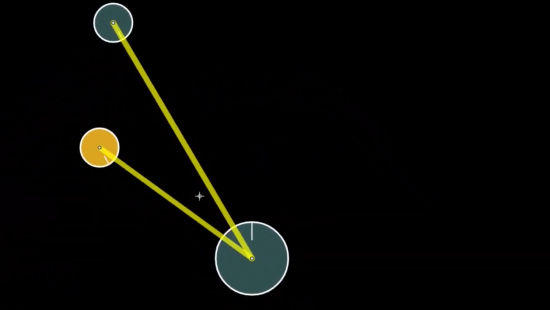
Without the effects of gravity in our 2D model, objects behave like balls on a pool table (or pucks on an air table). Shots are aimed using a ghost-ball technique (the ghost of a cue ball). This forecasts the resulting motion after a collision with a puck or wall. Forecast lines are based on the contact normals for a ghost ball touching the surface of the object ball (or wall). These collision forecasts are ideal in that the ghost ball is kept at the surface and does not penetrate the object. This is very close, but not identical to the approximate collision calculations of Box2D. For a discussion of ideal-contact-normal (exact) collision calculations, refer to the perfect kiss topic on the Python page.
|
|
| editing | |
|
The editing features can help you change existing demos, make new stuff, maybe even try some interactive satire. Coupled with the means to save it (state capture), the editor can produce something to be replayed. All of the demos on the S&P page were (to varying degrees) generated with the use of these features. You can find corresponding discussion on the S&P page (see "editing" link in the outline in the left panel). Keys used:
Get some pucks, position and rotate them, set attachment points, then connect them together with springs and revolute joints. |
|
Multi-select A first step in editing is to select one or more objects on the canvas. Do this by attaching a cursor spring (single-select) or by marking one or more objects as selected (multi-select). Objects in a multi-select group are marked with a yellow dot. Selection can be done in two ways: (1) drag the cursor over an object while the shift key is down (use the right mouse button to erase a mark), and (2) drag with the alt key down to form a selection box. |
|
Connecting with springs This is the first video to demonstrate the addition of a spring connection. This is done via the remove/add menu and also with the corresponding keyboard shortcut (ctrl-alt-S). This also shows the use of the multi-select menu that can be stepped through with the "tab" key. This directs actions to subgroups in the multi-select. Here, springs are given focus, then individual springs are stepped through with the "enter" key. S3 is shown to be compressed when dangling. And: a capture is used to change a spring's color; the edited capture is "run"; full-canvas viewing; gravity toggled; spring length adjusted as a group; a wall is moved and its width is increased; the two methods of cursor selection are shown using the "alt" and "shift" keys. |
|
Connecting with revolute joints This is the first use of a revolute joint. They can be added to a pair of multi-select attachment points via the remove/add menu and also with the corresponding keyboard shortcut (alt-R). Attachment points can be centered along a rectangular puck's narrowest dimension, and then pushed out to the end. This starts with turning off the COM feature (C key), and marking two attachment points with the shift key down. Then repeatedly use alt-C, first time centers, second time pushes to the end. Finally, the alt-R is used to attach the joint. A selected source spring is set for copying using ctrl-C. That spring can be pasted onto new attachement points using ctrl-S. To de-select the source spring, use ctrl-C (mouse buttons up). |
|

Pentagon of joints and springs A spring is added to the ends of a joined puck pair. The spring is lengthened until compressed and acting to keep the pair in line. The puck pair is duplicated and joined. One of the springs is set as a source for copying. This spring is pasted three times as the object is further extended and joined to complete the five-sided polygon. The "tab" key is used to give focus to the springs within the multi-select. The "enter" key then steps through the springs, showing a report, indicating compression (negative stretch) is equal in all five legs of the polygon. Various joints in the object are deleted to show the transition to a new equilibrium. The "tab" key is used to give focus to the joints so that springs are not deleted. |
|
|
A system's interactions, with itself and its environment, can be adjusted though the attributes of its pucks and springs. In the "multi-select" section above, size changes were made through the dimensional attributes of the pucks. Other attributes affect energy transfer and dissipation: restitution, damping, surface friction, and spring forces. In this section, I play with these. |
|
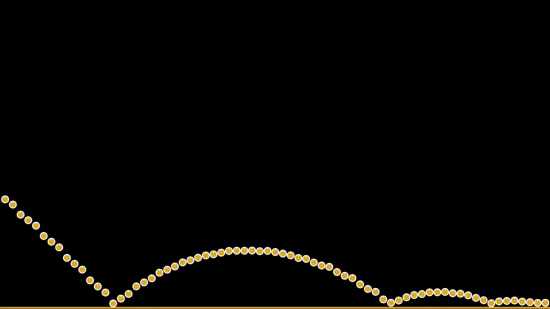
Restitution, align and linearize This is the first in a series of videos that shows how systems can lose energy: restitution, surface friction, translational and rotational drag, and spring damping. A line of balls with restitutions varying linearly from 0.86 to 0.61 are dropped. This video demonstrates the use of the alignment feature (use alt-L or the "align selected" option under the "remove/add items" control). A small puck is replicated to form a group which is then aligned. The restitution of the far left and right pucks is set using the [ and ] keys. The alignment feature is run again and now acts to linearize the restitution values of the intermediate pucks. Finally, the g key is used to turn on gravity. The middle segment of the video is rendered at 2x speed (I'm not that fast). The final bouncing-puck segment was recorded at a 4ms timestep and then rendered at 4x speed. |
|
Surface friction This video has four segments, each showing the effects of changing the surface friction. This puck attribute is changed using the minus (-) and plus (+) keys from the main part of the keyboard. Holding these keys down repeats the change.
|
|
|
Translational drag The three segments in this video show the effects of changing the drag coefficient. This puck attribute is changed using the less-than (<) and greater-than (>) keys. Holding these keys down repeats the change.
(Note: this one has been left unannotated, just too pretty to mark up. You might find the annotations, in the video in the Spring Damping section below, related and helpful.) |
|
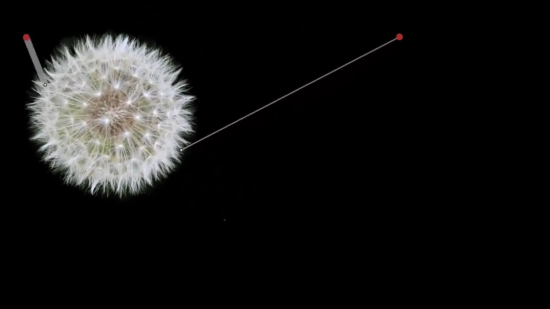
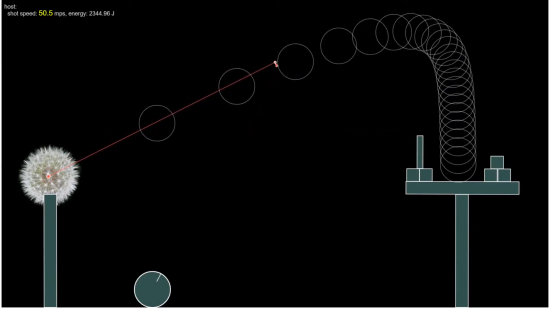
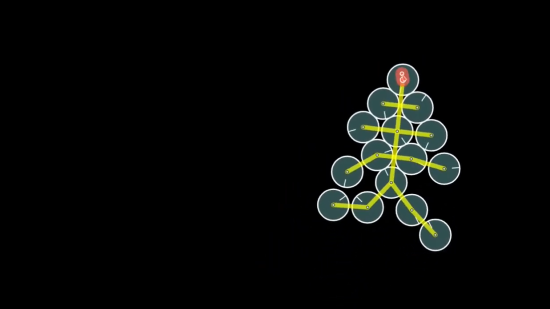
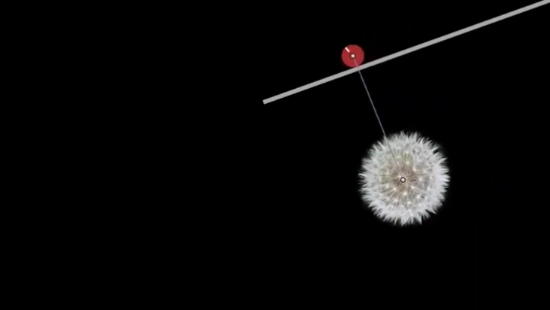
Rotational drag This video show the effects of changing the rotational drag coefficient. This puck attribute is changed using the less-than (<) and greater-than (>) keys with the alt key down. Holding these keys down repeats the change. This section wouldn't be complete without a dandelion being torqued by two springs. The little lion starts out with no rotational drag but some translational drag. There's no damping in the springs. Try cursor interactions with this system. The translational drag, coupled with the spring forces, act to return the puck to center after any displacement. |
|
Spring damping Here, the energy loss is affected by changing the damping coefficient of the connecting spring. This attribute is changed using the less-than (<) and greater-than (>) keys with the S key down. Holding these keys down repeats the change. This video compliments the one above on translational drag. There, the spring damping acts to eliminate the relative motion and form the perfect circular orbit. Here, the F key acts to halt the orbit, leaving the two pucks to oscillate on the damped and later the un-damped spring. |
|
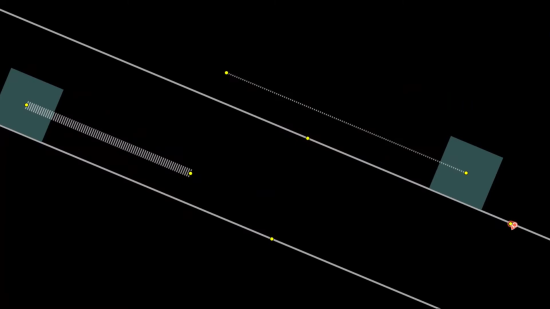
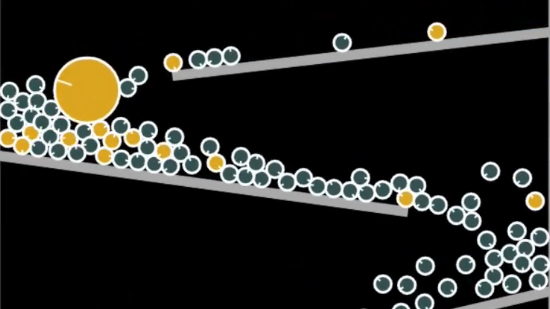
Spring length and stiffness There are three contrasting spring systems in the segments of this video: (a) pair of pucks, (b) blocks on an inclined plane, and (3) a pinned puck without gravity. Each of these demonstrates the spring nature as affected by length and stiffness. With the S key down, adjust a selected spring using the arrow keys:
|
|
| let's build one | |
|
In that it's probably helpful to see the editor in use, here are a few unrelated examples: |
|

Restoring order First step: the "e" key is used to enable editing (copying) of the anchor pins behind the each three-puck system. The "alt" key is held down while dragging the mouse to select a group. Then paste (replicate) the group at the position of the cursor using control-v. The "g" key is used to toggle the gravity on, then off. The right mouse button (strongest cursor spring) is used to get a good grip on one of the pucks and drag it around for mixing. Try this yourself and leave the wall/pin editor on to see the work that the springs do in restoring order to the multi-group system. There is a semi-transparent keyboard overlay in this video. The keys typically used in editing are highlighted green. |
|
The Puck Popper demos in the 7 and 8 groups (and seen in the games section below) were produced using the drone-path editing features seen in this video:
The video plays at double-time until the first capture is run. You may find the space bar useful to pause and read the annotations. A sister topic below, The nature of client and drone pucks, shows how to dial the game by editing a capture. |
|
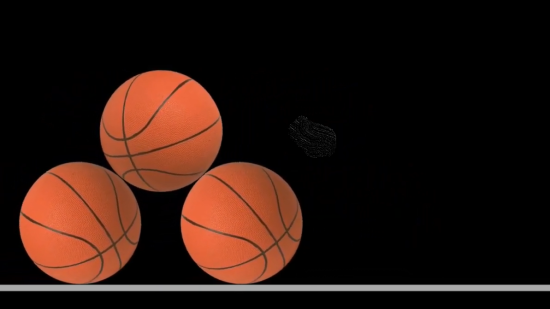
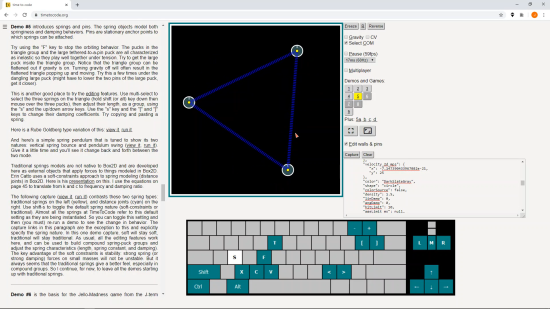
Fixed-length distance joints A Box2d distance joint can be configured for spring or fixed-length behavior. The fixed-length type is useful for building compound objects as shown in this video. Set the separation distance between two pucks, select them, then pick the "add fixed-length spring" option from the "remove/add items" menu. All editing features for springs apply also to these fixed-length springs (distance joints). After the first fixed-length joint is added (here), it is used as a source for identical replication in making the first row of the rolling pyramid (five equally spaced pucks). Then a subset of the row is used to make the next higher (and shorter) row. Later, two additional fixed-length joints are added to join the whole system into one compound body (motivating the disclaimer at the beginning, ha ha). At the end, all the joints are deleted. |
|
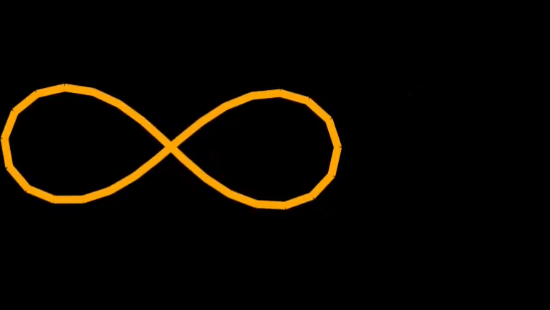
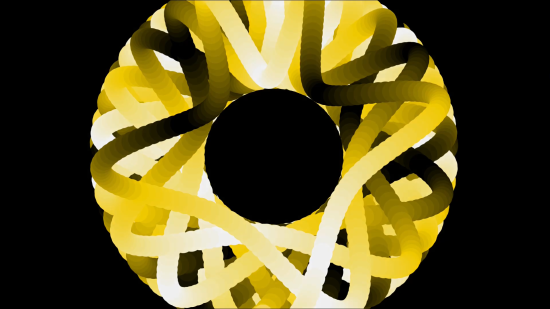
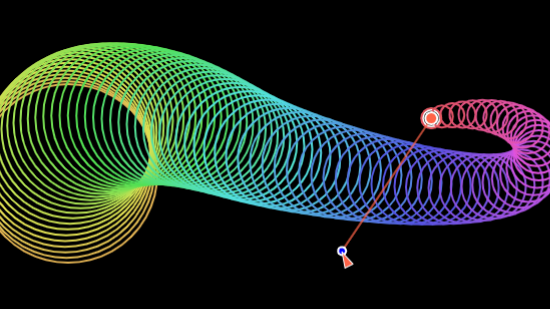
This topic is similar to "Pentagon of Springs and Joints" above. There are more, and smaller segments in the chain. Plus the joints, springs, and puck edges are hidden. This gives the appearance of continuous flexible stick, connected into a loop. The video starts by clearing off the canvas and adding a springy-chain from the remove/add menu. This system is also different in that all puck-puck collisions are inhibited. This allows for the overlap needed in making the infinity sign. The tear is formed by deleting one of the springs. The technique for targeting only springs for deletion is used and annotated in the video of the Pentagon topic. The f key is frequently used to momentarily stop translational movement. This brings the system to equilibrium quicker and is useful in encouraging oscillation modes of interest. |
|
The mass-weighted center of all the pucks on the canvas is shown as a small white circle with cross hairs. The second segment shows a compressed spring being added to a three-puck system. Notice how the system's center is unaffected. Only at the end, when a cursor spring is used to apply an external force, does the system center move. This serves as an introduction to the Internal/External topic below. |
|
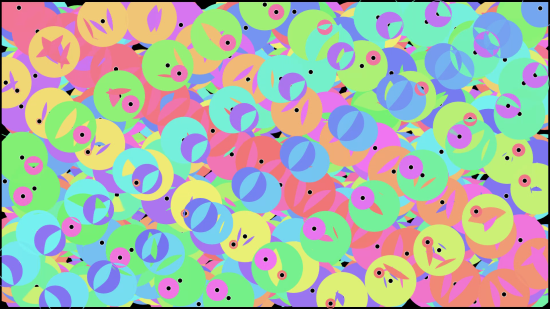
Hybrid edits The first clip shows the editor enlisted in changing the surface friction of the 101 pucks in demo 1b. The lower friction results in a more fluid motion as the system of pucks "drains" to the floor. The second clip uses the "modify capture" feature under remove/add to reveal the magic of how demo 1b produces a surprisingly ordered color pattern at the end of a seemingly random process. |
|
Tuning a spring pendulum The spring pendulum is a fascinating, yet simple piece of apparatus in the lab: spring with hanging mass. The first clip shows the resulting system after adjusting spring length, spring strength, and hanging mass to produce a ratio of pendulum period to spring-bounce period of about 1.8. Ratios near 2 will produce a system that wanders back and forth between two modes: a pure vertical bouncing motion and a pure pendulum motion. The second clip has the ratio up near 5 and shows a spring oscillation superimposed on an orbit around the pin. The third clip had the unstretched length of the spring adjusted to zero and yields a period ratio of exactly 1.0. Puck color is varied by stepping through the lightness index in the HSL color space. "alt-p" toggles screen erasing on/off and shows motion history. The "f" key stops movement.
|
|
| games | |
|
These games were originally intended to be fertile ground, a coding environment for students in a college J-term course on Python. Especially the Puck Popper game was useful for parsing out small assignments that led to a completed game, all within the scope of a few weeks of class time... So, of course, they are kind of cute, and I think, fun and playable. But that's for you to find out. They are short time-based games, that work well in small groups, couch co-op. No installs, no cost, cell phones are useful. Note the friendly-fire option under multiplayer; unselect it to team up against the drones. |
|
|
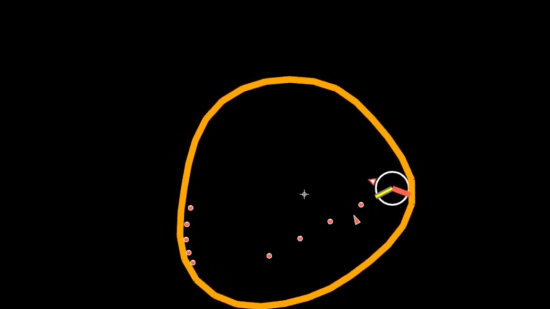
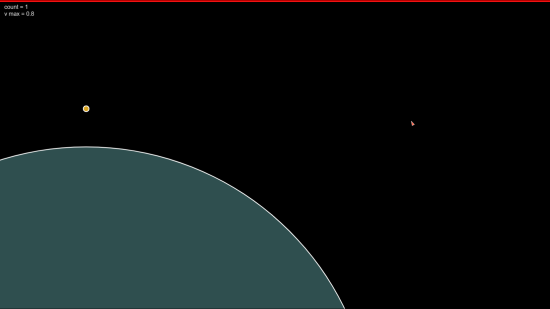
The Puck Popper game enlists computer drones that travel along a path, searching for targets, anticipating their motion and then shooting at them. The video in the previous section shows a drone puck working to clear out a set of targets. It sweeps the field, locks in, then aims the gun tube so as to lead the target, accounting for the movement that will happen after the shot. (playlist) Tips for playing against the drones and their aim-to-lead algorithm:
|
|
Driving with the keyboard This first video, an epic 3 minutes, describes the keyboard interface. The Google voice brings some attitude but does a nice job explaining the puck features. A keyboard is a good way to just get started and try it. You can bring up the 7a version of the game in a separate tab with this link. You'll see a written description and help in the left panel, similar to what's in this video. Note that a host room is not needed when a solo-player is using a keyboard. |
|
Network connections This video shows how to connect a cell phone (or laptop) to a second device (usually a desktop) that is serving as the game host. The mini-client page is demonstrated here, but the same approach can be used with the full client page. Synchronized cell phone (the virtual game pad) and desktop screen captures are shown superimposed in this and the next two videos. This gives you a sense of the two devices: the cell-phone game pad in your hands, with your eyes looking out at the desktop screen. Cell phone touch points are shown as white dots. (A few things have been renamed since this video was made: the menu item "mobile client" is now "mini-client", the page heading "time to code" is now "springs & pucks", the domain name timetocode.org is now triquence.org, and the default server name timetocode.herokuapp.com is now connect.triquence.org.) |
|
Virtual game pad The layout of controls on the virtual game pad (aka Two Thumbs) interface are explained. The game pad offers somewhat more fluid game play and generally, after a little practice, lower time scores in Puck Popper. |
|
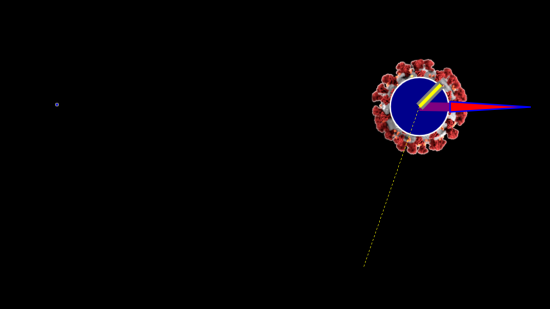
Taking aim at the Coronavirus Want to squish one of those little virus guys? Here's a Puck Popper game played with the drone puck in a Coronavirus costume. Try playing Puck Popper with the CV option selected. More ideas for customizing your game: changing the drone path and the nature of clients. |
|
|
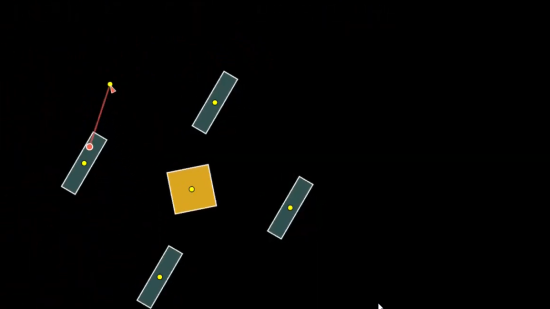
To stop the madness, detangle. Straighten out the block of jello (no pucks touching each other) and the tangle timer stops. Pass the jello to your opponent. Lowest time wins.
|
|
Marx brothers straighten out new jello This shows the rhythm of two players taking turns and playing Jello Madness. Also shown here is the use of the editor and capture features to create a custom version and save it for later use. While this is ideally played from one computer, this turn-taking approach can be adapted for use under social-distancing guidelines. All you need to do is share the capture (copy and paste it into an email), then load that capture (paste it into the capture box) and run it (click the #6 button) on each computer. Your scores will be reported and ranked by the time it took you to straighten out the jello. |
|
Tricks for beating 6a Editor can be handy for dealing with stubborn jello. This video shows ways to enlist it in separating those pucks. Any scheme that puts the light of day between the pucks, counts, a win. |
|
|
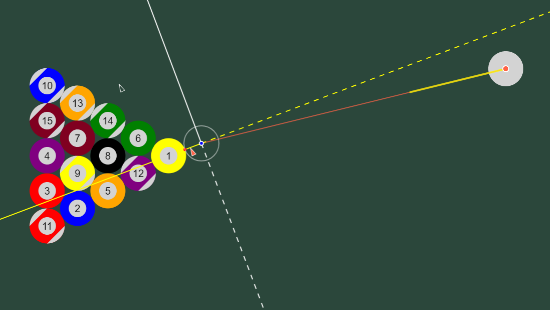
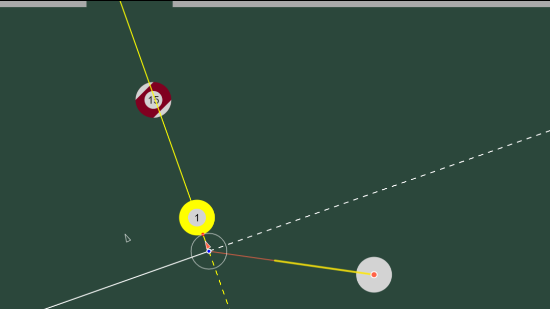
This pool game is built around the ghost-ball aiming method. An image of the cue ball (the ghost) can be positioned in contact with the object ball. Contact normals are drawn which serve to predict the paths of the cue ball and object ball after the collision. The game can be played with the client (a virtual gamepad). This facilitates demonstrations in the classroom, a teacher on the host computer, multiple students using the client on their cell phones or laptops. The second video in this section shows how to connect a client. (playlist) |
|
Playing solo on the host
Watch (or play) a game of Ghost-Ball on the host computer.
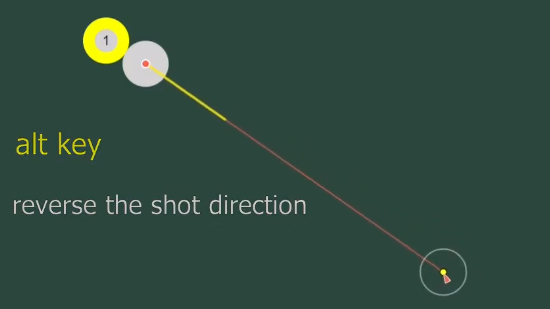
Note that "host" indicates playing directly on a computer (or device) without use of the network client (as seen in the next video). Shots in this video are aimed directly with a mouse. Touch pads and touch screens also work well on the host for aiming shots. |
|
Client has the ball QuietGuy uses a cell-phone client to aim pool shots on a host computer. Multiple players can use this network feature and participate in class demonstrations or couch co-op gameplay. The client works best if it and the host computer have access to local Wi-Fi. It uses WebRTC, native in browsers, to establish a peer-to-peer connection. The response of the client is best when a local route is established. (A few things have been renamed since this video was made: the domain name timetocode.org is now triquence.org and the default server name timetocode.herokuapp.com is now connect.triquence.org.) |
|
A few ideas... ...for special situations:
|
|
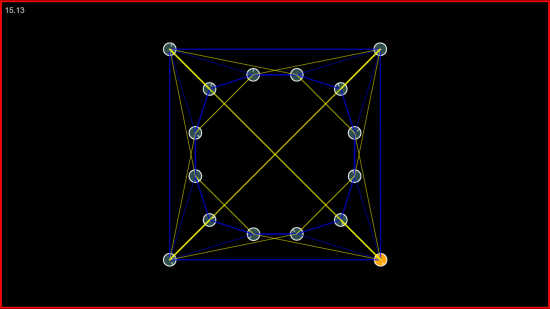
Racks and trick shots The line and arc methods are demonstrated in forming unusual rack patterns for trick-shot breaks. In one clip, gravity is turned on, introducing projectile motion to the game, as if the table has been lowered on one side. The final clip shows how the editor can be used to shorten, lengthen, and rotate the cushions of the table. |
|
|
Monkey Hunt and Bipartisan Hoops enlist gravity in producing projectile motion. Projectile forecasts are drawn. Monkey Hunt also has a sight line drawn. These are used for aiming at targets. With these projectile games, fine-adjust is toggled manually using a second-finger on a touch-screen client, or the b key on a keyboard client. This is in contrast to the fine-adjust positioning for the Ghost Ball pool game. There, fine-adjust turns on automatically as the ghost ball touches the object ball. |
|
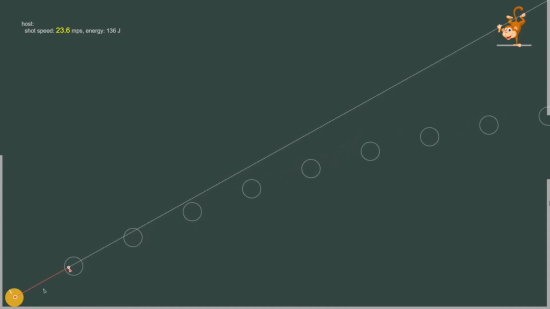
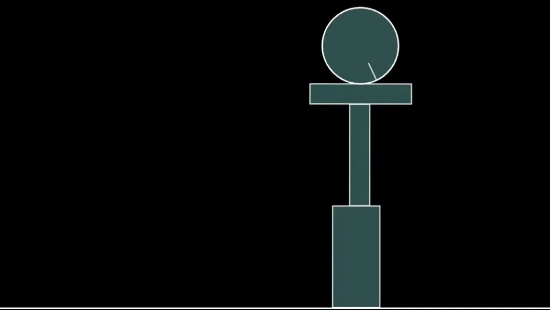
The classic physics demo, The Monkey and the Hunter, is animated here. The platform under the monkey releases when the ball is shot. The goal is to hit the monkey before he hits the ground, even more points if you send him outside via the window. You'll get six shots. The b key toggles on fine-adjust for better aiming. The s key can be used to manually setup the next shot (instead of waiting). Take up the hunt yourself. Follow the link. After the game loads in, press the v key to view it fullscreen. |
|
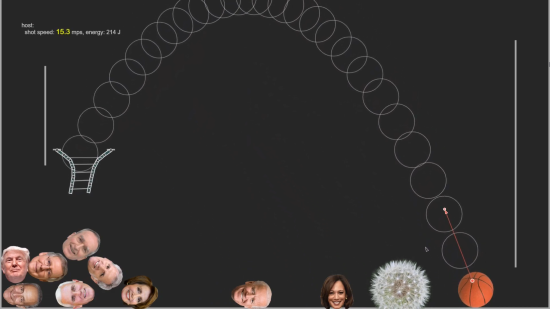
Presidents Biden and Trump bring their game. I show some reluctance. If you like, encourage all eight U.S. political leaders ('21-'22) to come off the bench. Follow the link, and then, after the basketball game loads in, press the v key to view it fullscreen. Godly, peaceful, and quiet...Scripture states, "First of all, then, I urge that supplications, prayers, intercessions, and thanksgivings be made for all people, for kings and all who are in high positions, that we may lead a peaceful and quiet life, godly and dignified in every way" (1 Timothy 2:1-2, English Standard Version). This is my prayer in making this game, that these leaders would allow us to lead godly, peaceful, and quiet lives. |
|
| sundries | |
|
Many of the videos on this page were recorded with use of the aspect_ratio full-canvas button as seen in the right panel on the S&P page. This enlarges the canvas to match the view port of the monitor (crisp 1:1 rendering) and provides more space to interact with the animations. This section has a few of my favorite recordings: (playlist) |
|
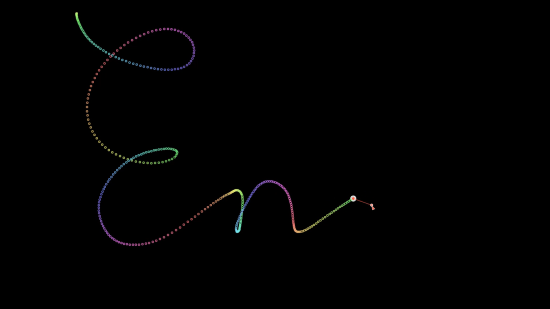
Moving the source A puck is emitting expanding circles (like sound). Each circle is incrementally tagged with a color from the visible spectrum, yielding the appearance of a rainbow tail behind the moving puck. During the recording, the puck diameter is adjusted (up and down arrow keys). (low-compression version: Vimeo) |
|
Counting to Pi A collision-counting method for calculating the digits of pi, is described in Galperin's paper and also a 3Blue1Brown video. The video here presents calculations of this kind yielding 1, 2, 3, and 5 digits of pi. The 2D pucks provide a good visual representation of the 100,000,000 mass ratio in the 5-digit case. Try this interactively by running 1c, 1d, and 1e on the S&P page. The first two cases use the Box2D engine. Higher number of digits require a small specialized engine that can be seen as the piEngine.js module. |
|
Please, don't erase... The 2e and 4d demos are run while inhibiting the canvas clearing (erasing) that happens at the beginning of each frame. Simultaneously press the "alt" and "p" keys to try it. For the 2e case, go full-canvas, shrink the puck all the way down (arrow keys), give it a good hard fling, then alt-p. |
|
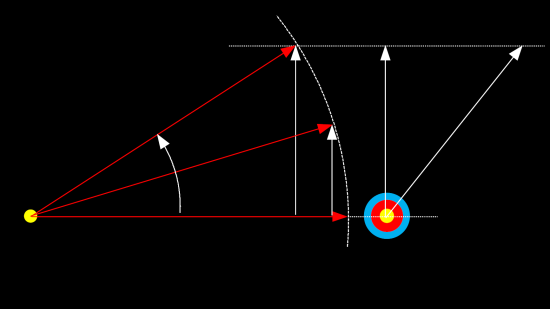
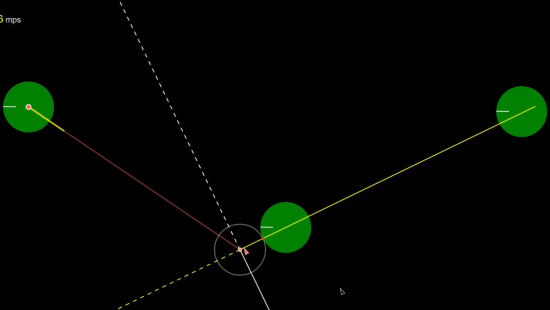
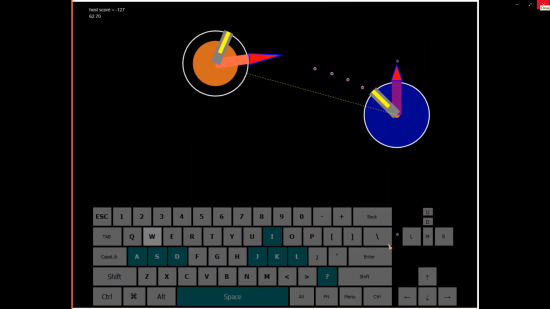
Leading the target This video starts with a diagram showing the relationship between the bullet and target velocities in Puck Popper. This is in the reference frame of the shooter (riding along) looking at the target. The idea is that the bullet will hit the target if the gun is angled such that its perpendicular component of velocity (perpendicular to the line between bullet and target) matches that of the target. This puts the bullet on the needed collision course (left-right movement matching the target). The other requirement is that the parallel component of velocity is such that, in time, the bullet will overtake the target and collide. The video records a session of the 8e version of the game. This version has settings that yield a nearly ideal environment for this aim-to-lead algorithm: (a) there are no drag forces associated with puck movement, (b) all collisions are elastic. Note that the settings that make this good for the aiming algorithm, make it harder to play. 8c is easier. This algorithm is implemented in a very small amount of code. Take a look at the aimToLead function in the puckPopper.js module. These calculations can be applied in estimating how to aim a shotgun, to lead, when skeet shooting. Assuming a muzzle velocity of 1200 fps, clay pigeon speed of 50 mph (73 fps), a shotgun length of 48 inches, and that your eye is about 3/4 of that length from the bead, you can calculate how far the bead needs to be from the line of site to the target: 36 * (73/1200) = 2 inches. |
|
High and low drag The effects of drag are demonstrated here using a system with two connected pucks. It's like a parachute providing a soft landing for a payload. Halfway through, the timestep is reduced, providing some slow-motion viewing. The ctrl-shift-L shooting lock has been applied here, so shots, at 200 mps, are done using drag and release. |
|
|
A modified puck popper (the cannibal) is introduced here. It accounts for the physics of shooting a bullet (launching a little puck):
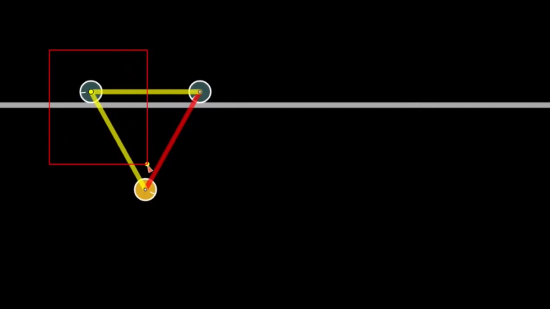
The cannibal is placed into three different rings: springy chain, chain, and triangle. Each of these is composed of pucks that contribute to the system center of mass. Whether inside or outside of the ring, the cannibal is not able to move the SCM until it uses its jet (an external force). |
|
| limitations | |
|
Box2D uses several approximations to simulate rigid body physics efficiently. This brings some limitations as quoted from the Box2D documentation:
The no gravity topic discusses deviations from ideal puck-collision physics. The next topic discusses limitations in modeling springs. |
|
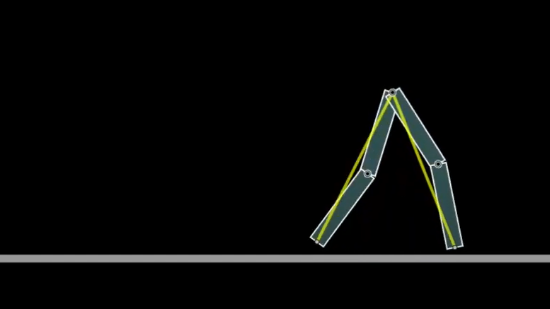
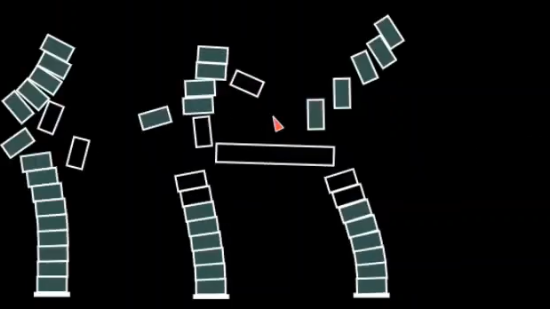
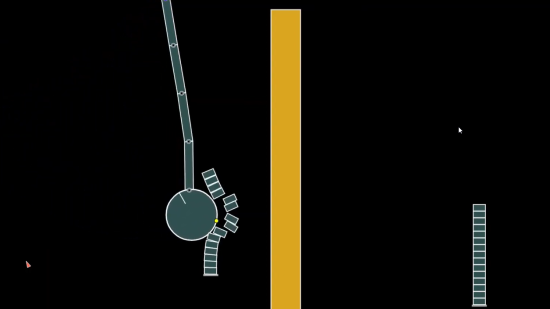
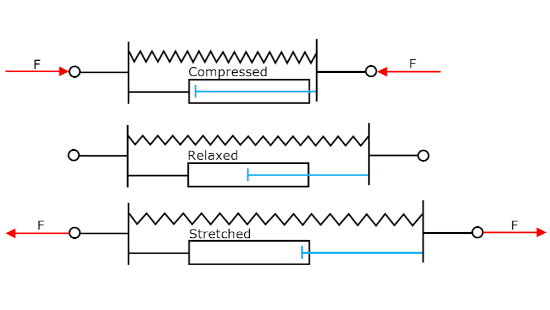
Instability and losses Hooke's law springs have reduced stability as shown in the first two clips. You can play with the tap dancer. After the demo loads, use the shift-alt-S command, and check to see that the timestep is set to 17ms. The third clip shows energy loss in an undamped distance joint (right side, third row). The Hooke's law equivalent (left side), shows the ideal undamped behavior. See also the corresponding demo and discussion for Box2D Distance Joints. |
|
| state capture | |
|
The capture feature can be used to save work that you've created/modified with the editor and then replay it. There are examples of this in the topics above such as the new jello used by the Marx brothers. However, there are object attributes that can not be modified through the editor. Many of these attributes are accessible through the JSON in a capture and can be changed there as shown in the following videos. |
|
The nature of clients, humans and drones The balance of power, in Puck Popper, between the client pucks and drone pucks, can be adjusted by editing the capture.
The host's puck is a template for all the network-client pucks. That keeps it fair if you are playing against each other and not only teaming up against the drones. Edit the following attributes on the host puck and you will see the same attributes on the network client pucks: radius_m, hitLimit, noRecoil, linDamp, restitution, restitution_fixed, friction, friction_fixed. As shown in the video, the starting positions and velocities, for each of the first four network clients, can be set in startingPosAndVels near the end of the capture. |
|
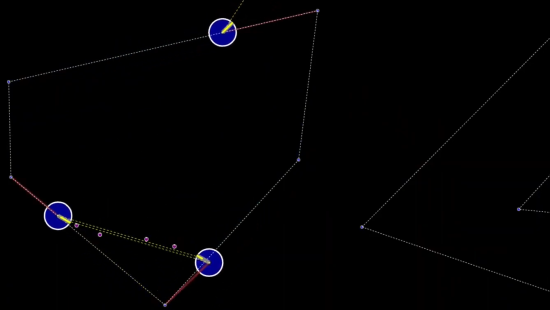
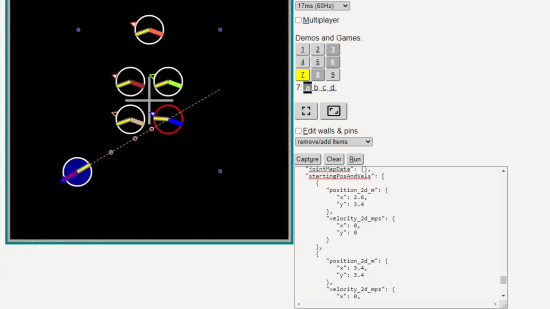
Adding angular momentum The goal: demonstrate conservation of angular momentum by changing the spring lengths of the tri-puck object in demo 5a. (similar to how figure skaters increase their rotation rate by pulling in their arms and legs during a spin) The group must be centered so the longer springs don't cause the pucks to touch the walls. The method (a dash of physics): Do this by editing a capture of the centered system. Change the y component of velocity of two pucks such that the net change of their y components of momentum is zero. This causes rotation without causing movement of the system's center. Alternative method (without the capture edit or physics): use multi-select to copy the rotating trio, then paste to a centered cursor position with control-v, then delete the original trio (for the reader to try, not in the video). |
|
Thanks for watching... This tale-end video shows how to edit the tail and puck attributes in the 2e capture to produce a non-expanding tail. |
|
|
. |
|